Mail Options - Junk Mail
On the Junk Mail page, you can do the following:
Junk Mail Filter Settings - Configure the Junk Mail settings.
Block List - Add addresses to the Block List so that the messages from addresses on this list will be permanently deleted and will not appear in your Inbox.
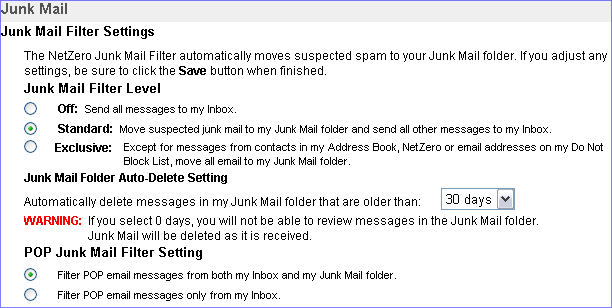
Junk Mail Filter Settings
Junk Mail Filter settings handles your incoming messages.
- Sign-in to Message Center.
- Click on Options and select Junk Mail.
- There are three Junk Mail Filter levels:
- Off - All incoming emails go to your Inbox.
- Standard - Messages considered to be junk by NetZero's junk filters are sent to the Junk Mail Settings folder. All other messages go to your Inbox.
- Exclusive - All messages will go to the Junk Mail Settings folder unless the message is from a contact in your Address Book or sent from NetZero.
Click the circle next to the setting you want.
- You can also determine how long messages stay in the Junk Mail folder before being automatically deleted. Choices from the drop-down menu include: Never, 90 days, 30 days, 15 days, 7 days, 2 days, and 0 days.
Warning: If you select 0 days, you will not be able to review messages in the Junk Mail folder. Junk mail will be deleted as it is received.
- When finished, click Save.
 .
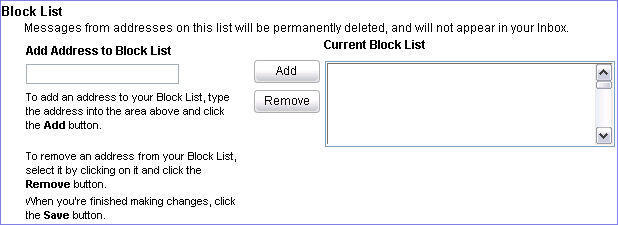
.Block List
The Block List lets you determine which messages you want to get sent straight to your Junk Mail folder. Block Lists can be used in conjunction with the Report As Junk feature, or configured separately from the Options menu.
- Sign in to Message Center and select Options.
- In the Block List section type an email address or domain in the box under Add Address to Block List.
- Click the Add button to add the address or domain to the list on the right.

- To remove an address or domain from the Block List, click the address or domain and click the Remove button.
- When you are finished, click the Save button. To cancel your changes, click Cancel.
Note: Messages from email addresses or domains on your Block List will be deleted before you sign in. Make sure your Block List does not contain any addresses or domains from which you want to receive future messages!
Back to the Main Menu
NGCV
 .
.